Introduction
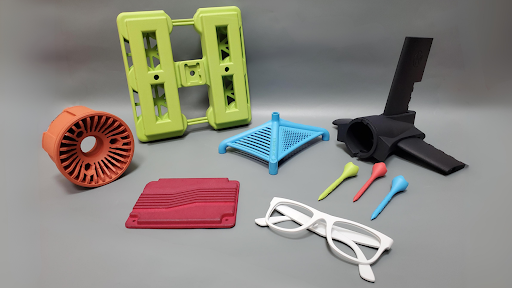
HP Multi Jet Fusion 3D printing has changed the game in additive manufacturing, delivering fast production times, strong mechanical properties, and the ability to print complex geometries that traditional methods can’t match. But while the technology itself is impressive, achieving high accuracy and a smooth surface finish isn’t just about hitting “print.” It requires strategic design, smart orientation, and careful post-processing.
Without these considerations, parts can suffer from warping, dimensional inconsistencies, rough textures, and poor fit in assemblies. Whether you’re designing for functional prototypes, production-grade parts, or high-detail cosmetic components, understanding how to optimize for precision and aesthetics will help you get the most out of HP Jet Fusion.
Let’s dive into the technical details of how to fine-tune your designs for the best possible accuracy and surface finish—without unnecessary post-processing headaches.
Precision Matters: Designing for Dimensional Accuracy
MJF is known for its high accuracy, but just like injection molding or CNC machining, tolerances vary based on material properties, part orientation, and overall design. HP Jet Fusion typically achieves tolerances of ±0.2 mm per 100 mm, making it comparable to traditional manufacturing in many cases. But if you want to push precision to its limits, design decisions matter.
How Shrinkage and Warping Affect Accuracy
One of the biggest factors influencing dimensional accuracy in MJF is thermal shrinkage. Because the printing process involves fusing powder with heat, cooling effects can cause minor distortions—especially in long, thin features or asymmetric parts.
To minimize accuracy issues:
- Keep thin features short. Parts with high aspect ratios (above 10:1) are more prone to warping. If long, thin sections are necessary, consider reinforcing them with ribs or other structural elements.
- Maintain uniform wall thickness. Uneven thickness causes uneven cooling, which leads to dimensional distortion. Aim for consistent walls throughout the design.
- Orient critical features in the XY plane. MJF parts tend to be most accurate in the horizontal direction, while the Z-axis is slightly less predictable due to layer-by-layer fusing.
Designing for Fit and Assembly
For parts that need to interlock, slide, or fit precisely into an assembly, designing with proper clearances is key. Because MJF parts may experience slight thermal expansion, maintaining realistic tolerances prevents frustration during assembly.
Recommended clearances include:
- 0.4 mm for snug fits (mating parts that need some friction but still come apart easily).
- 0.7 mm for moving parts (clearance to prevent fusing during printing).
- Slight interference for snap fits (values depend on material flexibility).
It’s always a good idea to prototype and test fitments before committing to final production. Iterative design adjustments help fine-tune tolerances for real-world applications.
Beyond Accuracy: The Science of Surface Finish
MJF creates high-resolution prints, but surface finish is still influenced by layer lines, powder adhesion, and print orientation. If you need a smooth surface right out of the printer, strategic design and post-processing techniques can help.
Understanding Layer Lines and Stair-Stepping
Like all layer-based manufacturing methods, MJF produces visible layer lines, especially on inclined or curved surfaces. The thickness of each layer in HP Jet Fusion printing is 80 microns (0.08 mm), which is finer than most fused deposition modeling (FDM) printers but still noticeable under certain lighting conditions.
To reduce visible stepping:
- Avoid angles below 20° in the Z direction. Features printed at low angles tend to show more pronounced stair-stepping effects.
- Keep critical surfaces facing downward. Downward-facing areas often have a slightly smoother finish than upward-facing ones.
- Use fillets and chamfers instead of sharp transitions. Abrupt changes in geometry make layer lines stand out more. Rounded edges help blend the effect.
Enhancing Aesthetics with Engraving and Embossing
MJF supports detailed text, logos, and engravings, but there are best practices for keeping these features sharp and readable:
- Use a minimum depth or height of 1 mm for embossed and engraved details.
- Choose bold, sans-serif fonts with clear spacing to improve legibility.
- Orient fine details in the XY plane for the best resolution.
If text or symbols need to be exceptionally sharp, consider post-processing methods like dyeing or vapor smoothing to enhance visibility.
Post-Processing: Taking Accuracy and Surface Finish to the Next Level
Even with great design practices, most MJF parts benefit from some level of post-processing. The right finishing techniques can improve both aesthetics and functional performance.
Powder Removal and Cleaning
MJF prints emerge from the build chamber coated in unfused powder, which must be thoroughly removed before further processing. This is especially important for hollow parts and lattice structures.
To ensure complete powder removal:
- Include drain holes of at least 5 mm in diameter for enclosed cavities.
- Use compressed air or bead blasting to clear residual powder from intricate areas.
- Design internal lattice structures with gaps of 5 mm or more to prevent trapped material.
Smoothing and Finishing Options
Once parts are cleaned, several techniques can enhance surface finish:
- Bead Blasting – A quick way to smooth surfaces by removing fine powder residues and slightly refining texture.
- Dyeing – A simple method for adding uniform color while maintaining surface details.
- Vapor Smoothing – Uses a chemical process to seal the surface, reducing porosity and giving the part a polished look. This is particularly useful for consumer-facing products and water-resistant applications.
Each finishing method has trade-offs. Vapor smoothing significantly improves surface quality but may slightly alter dimensional accuracy. Bead blasting and dyeing preserve details while providing moderate aesthetic enhancements. The right choice depends on the part’s end use.
Designing for Success in HP Jet Fusion
Mastering accuracy and surface finish in HP Jet Fusion printing requires a blend of smart design, precise tolerances, and effective post-processing. By considering how heat, shrinkage, and layer lines affect final parts, manufacturers can optimize their designs to achieve better fit, function, and visual appeal.
Whether you’re printing for high-performance engineering applications or cosmetic prototypes, following these best practices will help you get the most out of MJF technology.
For those looking to push their designs even further, RapidMade offers expert consulting, production services, and post-processing solutions to refine accuracy and aesthetics in HP Jet Fusion printing.
Explore how we can help optimize your designs at RapidMade.com.